Introduction
It’s been a busy few weeks here are Riomhaire Research since we decided to embrace the DevOps development culture. There is a lot to learn, although alot of the techniques have been around for years, it is the combination of Agile Developement with test automation, instrumentation and virtualization with clustering which makes it so potent.
One of the early decisions we made was to look at software to manage distributed systems and automate the deployment of applications - especially from the perspective of a cluster. There are a number of big players in this sphere: Ansible, Kubernetes, Puppet, Chef to name a few and we plan to look at a number of them to see how they stack up against each other. As a company we don’t have a big server farm (although we do have a number of desktops which could be used), and at the moment we dont want to pay for aws cloud instances - although prices are quite reasonable. So is there a ‘cheap’ alternative? The answer is ‘yes’ if your application needs and demands are quite modest.
Theign - A Raspberry PI Cluster
The Raspberry PI is a small single-board computer which with version 3 has:
- 6× ARM Cortex-A53 CPU’s running at 1.2GHz
- 1GB of RAM .
- GPU: Broadcom VideoCore IV
- 10/100 Ethernet,
- 2.4GHz 802.11n wireless
- Bluetooth 4.1
- microSD upto 32GB
- HDMI
- 4× USB 2.0
All in a package around the size of a credit card and at a price of around 30 Euro. Ideal for the hobbyist and tinkerer alike.
There are many sites which show you how to build Raspberry PI based cluster: Instructables and Thundax to name a few. To cut a potentially long story short, for the cost of a mornings work and 360 Euro we built ‘Theign’ a six node PI Cluster:

Creating the boot images and after the first boot defining the machine name and enabling remote ssh access with auto-login via certificates are necessary to enable Ansible to work.
LightAuth
The next thing is to see what kind of performance we got when we deploy an application to each of the nodes in the cluster. From colleague’s we have heard a number of good things about ANSBLE so we thought we would use that for a first try to install and distribute an application. LightAuth is the application we chose as the test application for a number of reasons:
- We wrote and maintain it as an application for learning Go-Lang and its community.
- The application is not a trivial ‘hello world’ web-service. The Authenticate method uses pbkdf2 to generate hashes for example.
- There are few dependencies.
- Configuration files are external - not everything is baked into the application.
- There is a JMeter test script which generates call rates which we can use to gather performance.
In short what we are trying to create is:
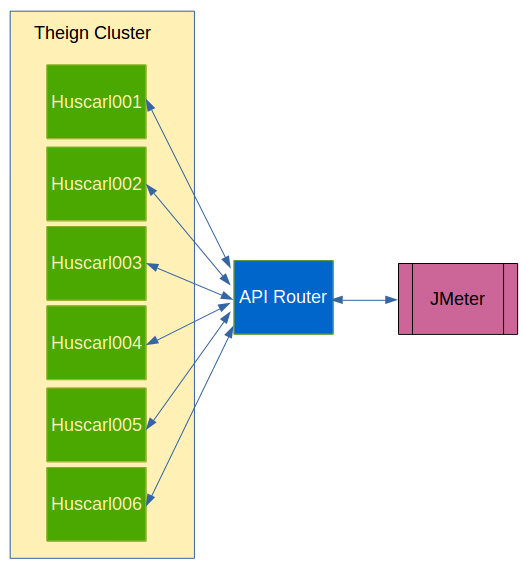
Where each node within the cluster will run an instance of the LightAuth application, and the API router will route calls to instances dependent on its own logic (see Linkerd documentation).
The API Router is a common pattern that we have described before and we configured our API router (using linkerd) to point to each of the huscarl nodes within the Theign cluster for the routes defined within the LightAuth documentation:
   /http/1.1/*/*/api/v1/session => /#/api/v1/session;
   /http/1.1/*/*/api/v1/authentication => /#/api/v1/authentication;
And the files for ‘authentication’ and ‘session’ list the hosts in the cluster and the port 3000 used by LightAuth as a default.
Ansible and Service Installation
We have an application (LightAuth) and it has a configuration file (the list of users) and we want the application to start when the server starts up - a service. As described in our Mail Server post defining a service which is understood by Linux is a fairly straight forward. The basic steps are:
- Compile the application for the target Linux version/architecture - In our case Raspbian AMD.
- We put the application binary in some well known location - say /usr/bin.
- LightAuth list of users is a configuration file - so naturally that lives somewhere under /etc
- Define a “lightauth.service’ file and store it with the other service definitions under /etc/systemd/system
- Tell Linux to enable and start the service.
First of all we will create a directory to hold all our deployment artifacts. Cross Compiling a GO application for a specific architecture took a jiffy and copying the example users file from the lightauth repository removed the need to generate our own for testing purposes. Creating the service definition, if we only have the minimal requirements then what we need is:
[Unit]
Description=LightAuth Service

[Service]
Restart=always
ExecStart=/usr/bin/lightauth -usersFile /etc/lightauth/users.csv
ExecStop=/usr/bin/killall lightauth

[Install]
WantedBy=default.target
Since this is useful we have now added it to the lightauth project.
Defining the basic ANSIBLE playbook took a little more work and research, but the ANSIBLE documentation is an excellent source of information. It is fairly easy using the “hosts” group feature of ANSIBLE inventory to group your machines/hosts/nodes into logical groupings for ‘dev’, ‘integration’, ‘production’ so you can replay playbooks in each environment. For this experiment we want to use all the nodes in Theign so we created a group called ‘cluster’ which pointed to the nodes within Theign.
It is good practice to document your playbook, though to be honest they are pretty readable without them. The playbook to install and start LightAuth is:
---
- hosts: cluster
  become: yes
  become_method: sudo
  gather_facts: yes

  tasks:
    # Kill/Stop any existing lightauth process
    - name: Stop Existing LightAuth
      command: /usr/bin/killall lightauth
      no_log: True
      ignore_errors: yes

    # Create lightauth directory within /etc and dont error if it already exists
    - name: Creates lightauth config folder
      file: path=/etc/lightauth state=directory
      no_log: True

    # Copy across users file to the config directory
    - name: Copy across config/usr file
      copy: src=users.csv dest=/etc/lightauth/users.csv owner=root group=root mode=0644 backup=yes

    # Copy lightauth application
    - name: Copy across lightauth application
      copy: src=lightauth dest=/usr/bin/lightauth owner=root group=root mode=0755

    # Copy across service definition file
    - name: Copy across lightauth service
      copy: src=lightauth.service dest=/etc/systemd/system owner=root group=root mode=0777

    # Start and enable the lightauth service
    - name: Start and enable the lightauth service
      service: name=lightauth enabled=yes state=started
The ‘remove’ service is equally simple within Ansible:
---
- hosts: cluster
  become: yes
  become_method: sudo
  gather_facts: yes

  tasks:
    # Stop and disable the lightauth service
    - name: Stop and disable the lightauth service
      service: name=lightauth enabled=no state=stopped

    # Remove service definition file
    - name: Remove lightauth service
      file: path=/etc/systemd/system/lightauth.service state=absent

    # Remove lightauth application
    - name: Remove lightauth application
      file: path=/usr/bin/lightauth state=absent

    # Remoce lightauth directory within /etc and dont error if it already exists
    - name: Remove lightauth config folder
      file: path=/etc/lightauth state=absent
What surprised me when we executed the deploy playbook:
time ansible-playbook -l cluster deploy-lightauth-playbook.yml
was how long it took to execute - as this copy-and-paste snippet shows:
....
PLAY RECAP *********************************************************************
huscarl001                 : ok=7    changed=2    unreachable=0    failed=0
huscarl002                 : ok=7    changed=2    unreachable=0    failed=0
huscarl003                 : ok=7    changed=2    unreachable=0    failed=0
huscarl004                 : ok=7    changed=2    unreachable=0    failed=0
huscarl005                 : ok=7    changed=2    unreachable=0    failed=0
huscarl006                 : ok=7    changed=2    unreachable=0    failed=0


real	0m20.682s
user	0m7.620s
sys	0m2.760s
Twenty seconds to deploy and install LightAuth across six nodes!!! Wow is all we can say.
Performance Test and Results
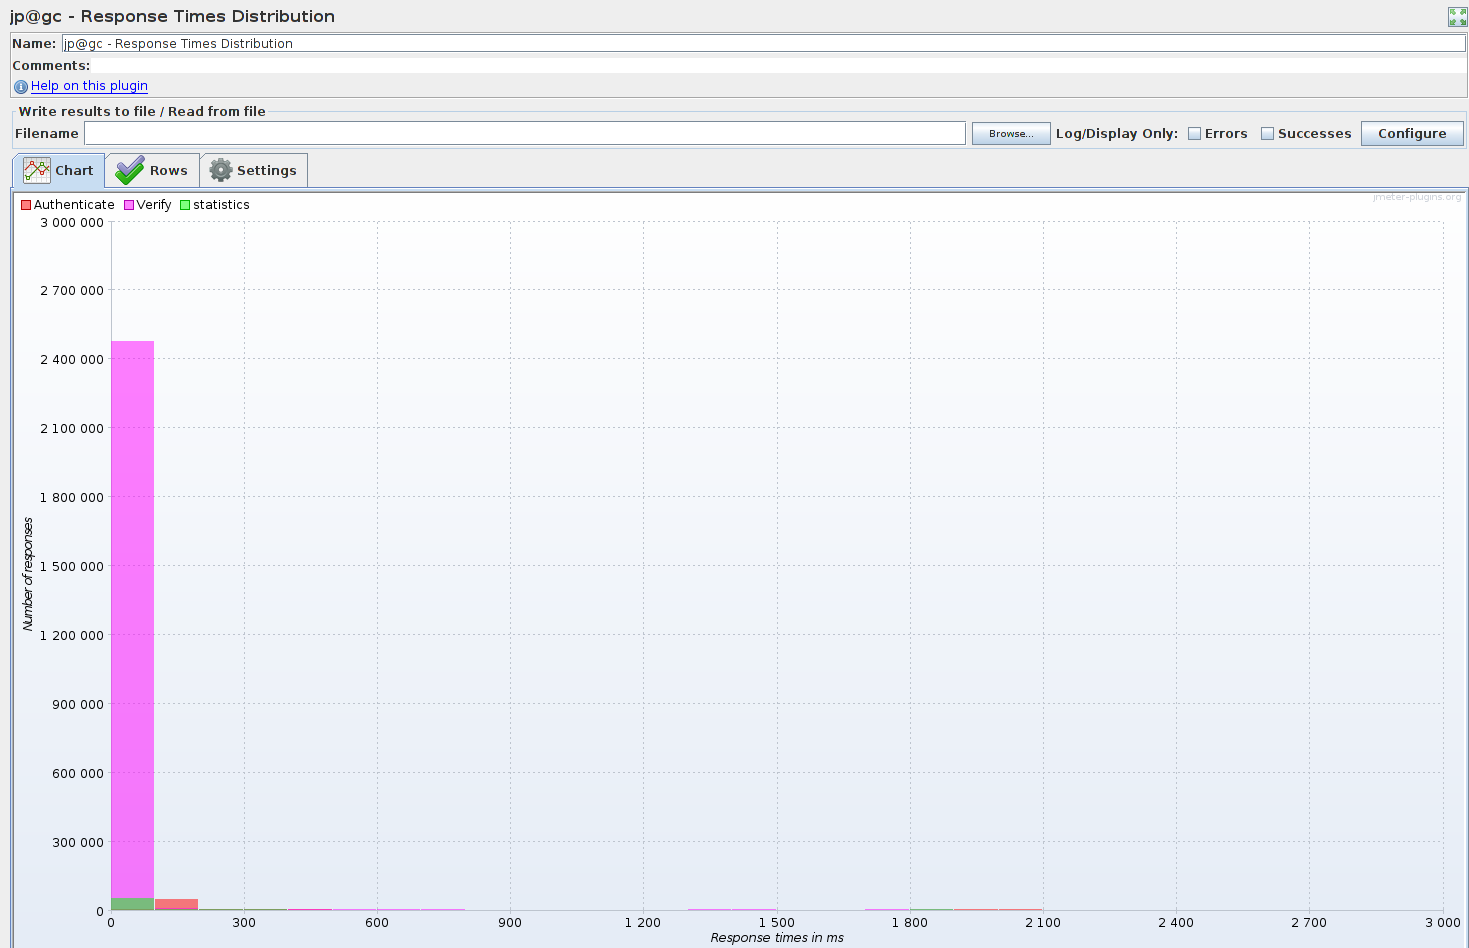
As we mentioned before we use the jmeter test script provided with LightAuth to test the cluster. This script was then altered to use the api gateway router as the target. Other than that it uses 50 threads (users) to call the ‘Authenticate’ method to retreive the JWT access token and then makes 50 calls to the ‘Verify’ method to simulate calls that other services would make to verify a token is valid, and finally a call to gather some statistics. This is then repeated a thousand times.
The results we found were quite surprising…

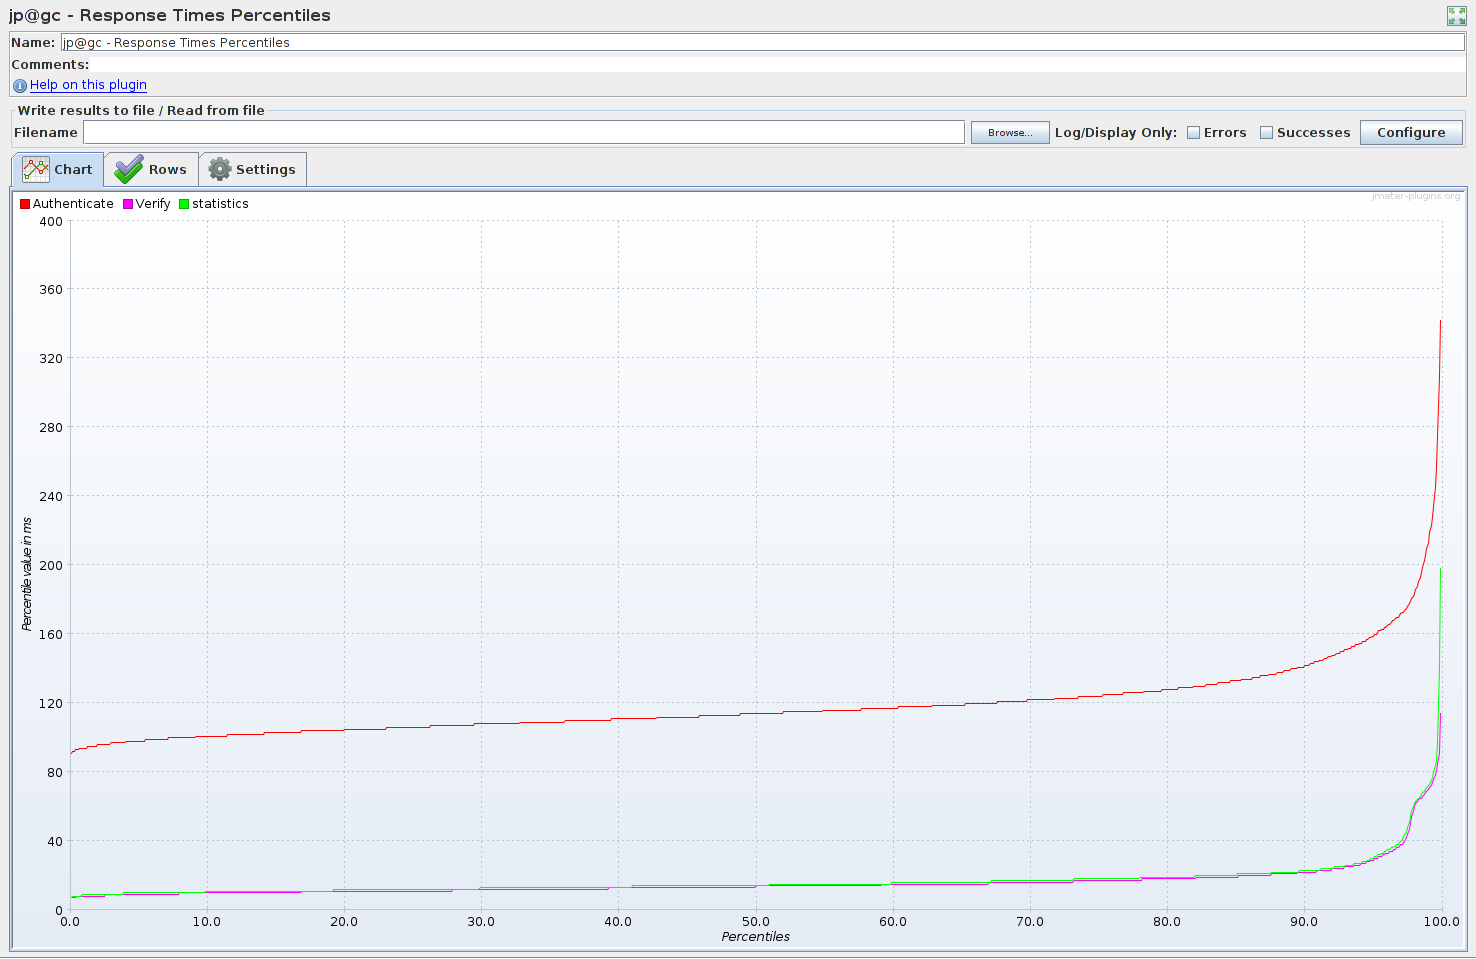
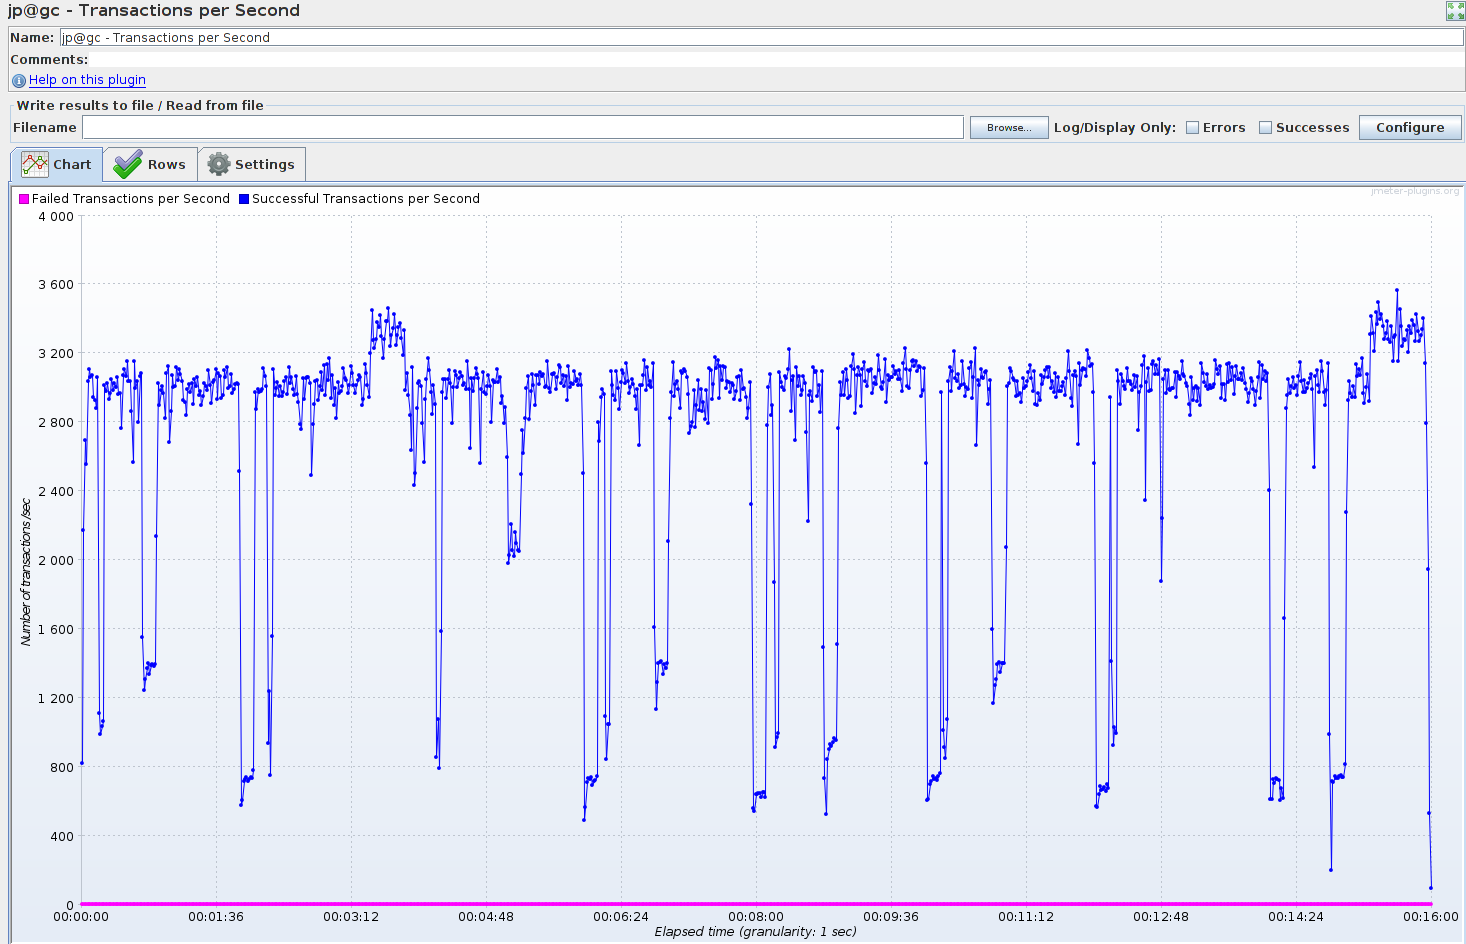
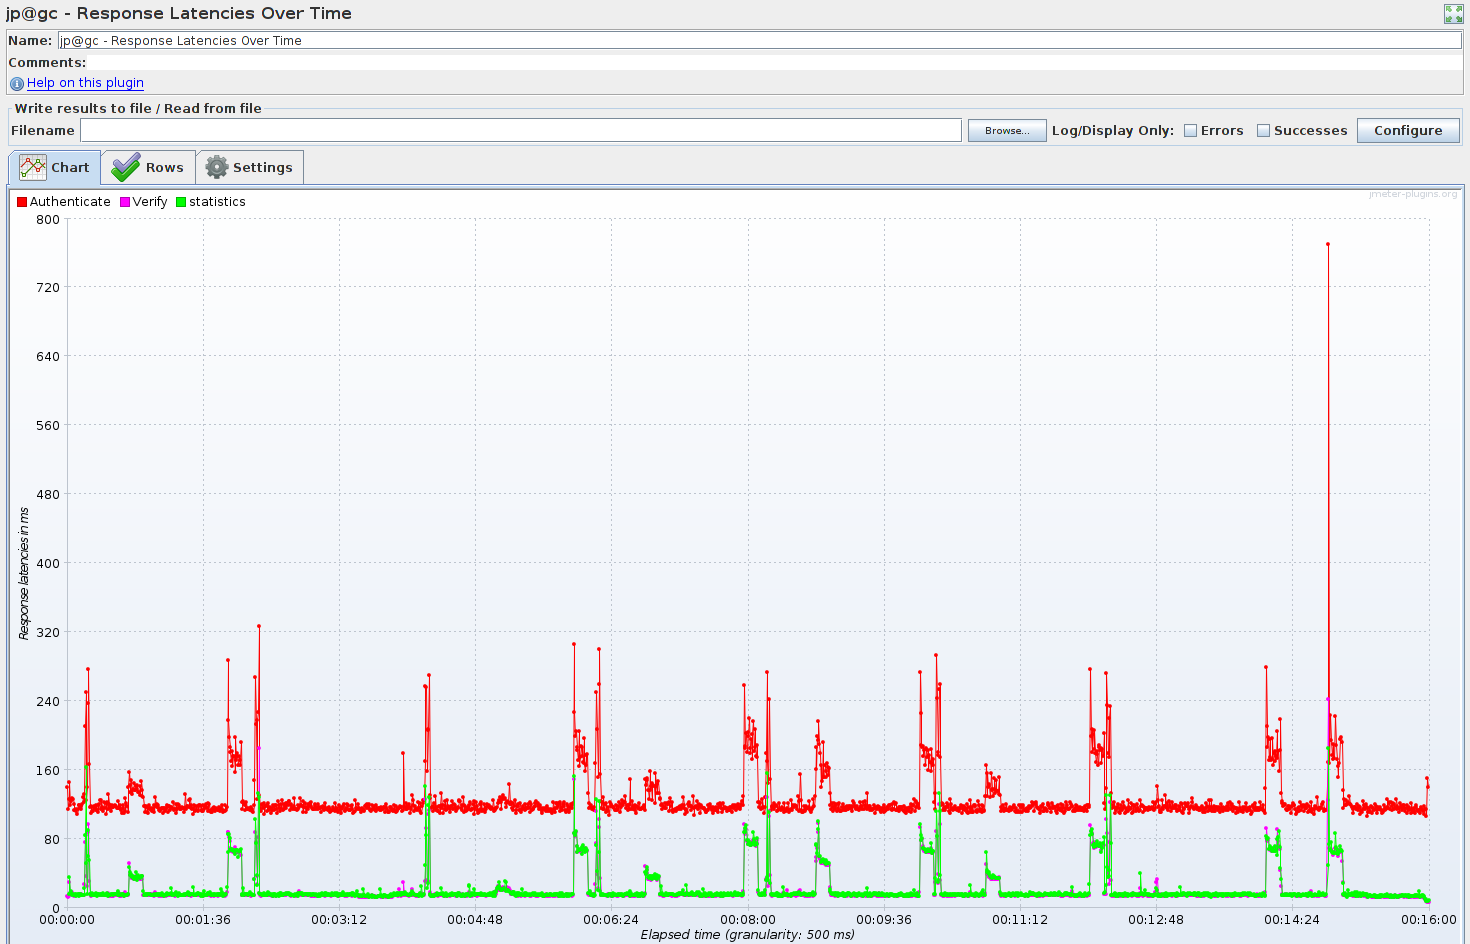
In short we were getting 2700 Calls/Second sustained over time via what was is effect the same CPU used in a phone.